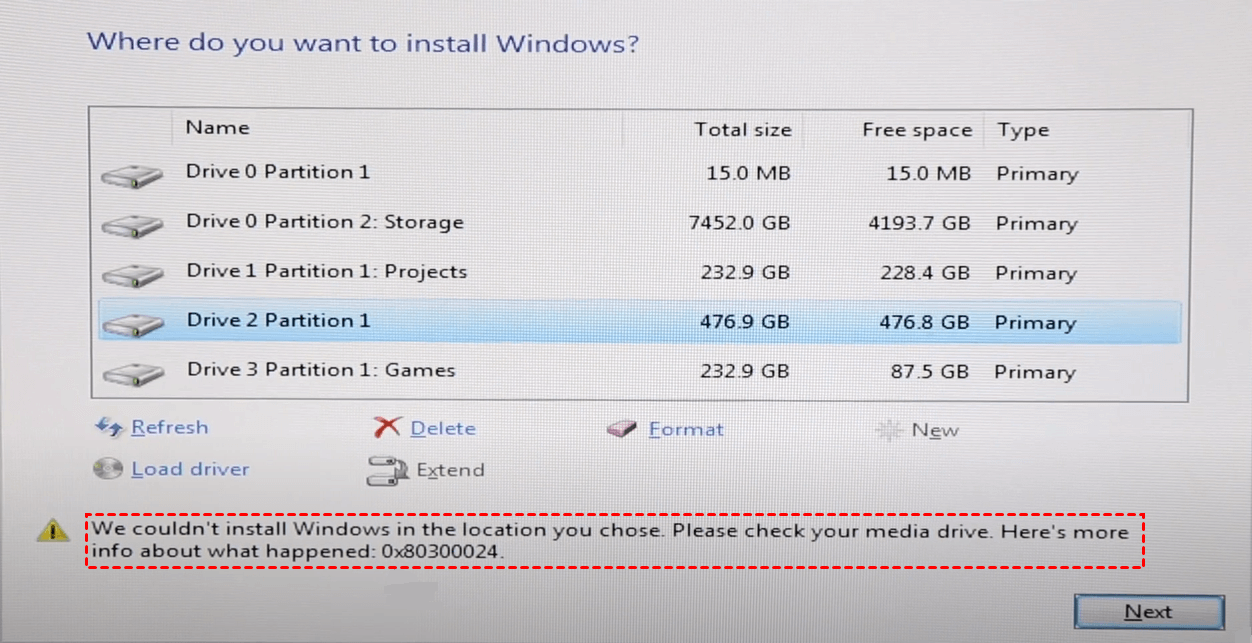
Error code 0x8030024 is a common error associated with the Microsoft Windows 10/11 Update service. It usually occurs when an installation windows 10/11 Error code 0x8030024 is encountered during the installation of windows updates, indicating that the update installation has failed.
Several factors could cause this windows 10 installation Error 0x8030024, including missing or corrupt system files, incorrect system configuration, or conflicts with other software.
Here are some steps you can take to troubleshoot this installation error 0x8030024 in windows 10/11.
Run Troubleshoot to fix installation Error code 0x8030024 I windows 10/11
- Open the Control Panel: Click on the Start menu and type “Control Panel” in the search bar. Click on the Control Panel app to open it.
- Click on Troubleshooting: In the Control Panel, click on “Troubleshooting” option.
- Click on System and Security: In the Troubleshooting window, click on the “System and Security” option.
- Run the Windows Update trouble-shooter: Click on the “Fix problems with Microsoft Windows Update” link under the “Windows” section. This will launch the Windows Update trouble-shooter.

Follow the on-screen instructions: The trouble-shooter will ask you a series of questions and perform some automated checks.
Follow the on-screen instructions and wait for the trouble-shooter to complete the scan.
Apply any recommended fixes: Once the trouble-shooter has finished scanning, it will show a list of issues that were found.
Apply any recommended fixes by clicking on the “Apply this fix” button.
After the restart, check if Windows 10 Update is working properly. If not, you may need to perform additional troubleshooting steps or seek further assistance.
-
Make Sure the Boot Order Is Correct
Restart your computer.
Follow the given instructions on screen that you can see when your PC start up. Most of cases you can type the BIOS/ Setup
Press to Delete key, and F1or F2 key, but the situation varies according to your system configuration.
After an entering a BIOS, go to Boot tab option to check your boot order.
Change order of Boot – set the destination drive for Windows 10/11 installation code 0x8030024 as per like first boot order.
Save the changes and exit from the BIOS.
Reinstall Windows on your PC and check if the windows installation error 0x8030024 goes through successfully.
Check your internet connection:
An unstable or slow internet connection could cause the update to fail windows 11 installation 0x8030024. Ensure you have a stable and fast internet connection before attempting to install the updates.
Disable third-party antivirus software:
- Third-party antivirus software can sometimes interfere with the Windows 10/11 Update service and cause the installation to fail. Temporarily disable any third-party antivirus software and try to install the updates again.
- Open the task manager: Press “Ctrl+Shift+Esc” or “Ctrl+Alt+Delete” on your keyboard, then click on “Task Manager”.
- Identify the software: In the task manager, look for the software that you want to disable. You can sort the list by name, CPU usage, or memory usage to help you find it.
- End the task: Once you have identified the software, right-click on it and select “End task” from the context menu. This will stop the software from running.
- Disable startup programs: To prevent the software from running automatically when you start your computer, you can disable it from the startup programs list.
- To access this list, press “Windows key + R” on your keyboard, type “msconfig” in the “Run” dialog box, and press “Enter”. In the “Startup” tab, uncheck the box next to the software that you want to disable.
- Use safe mode: If you’re having trouble disabling the software while in normal mode, you can try booting your computer in safe mode.
- To do this, restart your computer, then press and hold the F8 key as your computer boots up. This will bring up the advanced boot options menu. From here, select “Safe Mode”.
- Press “Enter”. Once you’re in safe mode, you can try disabling the software again.
- Remember that disabling third-party software can cause problems with your computer’s functionality.
Format an installation device:
Here are the simple steps to format an installation device:
Insert the installation device (such as a USB drive or CD/DVD) into your computer’s USB port or CD/DVD drive.
Open the “File Explorer” or “Finder” on your computer and navigate to the installation device.
Right-click on the installation device and select “Format” or “Erase” from the dropdown menu.
Choose the file system you want to use (such as FAT32 or NTFS) and give the device a new name if desired.
Click “Start” or “Format” to begin the formatting process.
Wait for the formatting process to complete, which may take a few minutes depending on the size of the device and the speed of your computer.
Once the formatting is complete, you can use the windows 10/11 installation error code 0x8030024 device to install an operating system or other software onto your computer.
Freeing Up Space
Plug or insert the installation media, then reboot your computer. Make sure you choose the correct option to boot your PC or system from the installation media.
Select your required language, then accept to the license terms and Conditions.
Select to the Custom.
Click to Drive Options to format the destination drive. Pick the right partition, then Press to Delete option.
- Press to Next restart the installation process.
Safe Partition Deletion:
Deleting a partition on the installation location is a critical operation that should be done with caution as it can result in the loss of all data stored on that partition, including the operating system. If you still need to delete a partition on the installation location, follow these steps to ensure that you do it safely:
Create a bootable USB or CD/DVD containing a partition manager software.
Boot your computer from the bootable media.
Launch the partition manager software and select the partition you want to delete.
Right-click on the partition and select “Delete” from the context menu.
Confirm the deletion by clicking “Yes” or “OK”.
Apply the changes to the disk by clicking on the “Apply” or “Execute” button.
After the partition has been deleted, create a new partition, or install a new operating system on the unallocated space if you want to use the disk again.
Ensure to backup any important data before deleting any partition to avoid losing your data permanently.
Recent Posts
-
Troubleshoot this Office Installation Error Code 1603 October 22, 2024
-
How to Speed Up Windows 11: Troubleshooting Error Message October 22, 2024
-
Fixing the Windows Update Error KB5040442 October 22, 2024
-
Fixing the Windows Error Code 0x80080005 October 22, 2024
-
Troubleshoot the Windows Error Code 0x800b0109 October 22, 2024