The windows 10/11 update Error code 0x8024A10A is a common issue that occurs when a Windows operating system is unable to complete an update. This Windows 10 update Error code 0x8024A10A usually appears with a message saying, “Windows could not search for new updates” or “An error occurred while checking for new updates for your computer.”
The Windows 11 update Error code 0x8024A10A is typically caused by a problem with the Windows Update service or a network connection issue. In some cases, it can also be caused by a corrupt system file or a conflicting program that is interfering with the update process.
Steps to Resolve Windows 10/11 update Error code 0x8024A10A
Check your network connection:
Ensure that your computer is connected to the internet and that your network connection is stable. Try to visit some websites or run a speed test to check the connectivity.
Run SFC and DISM
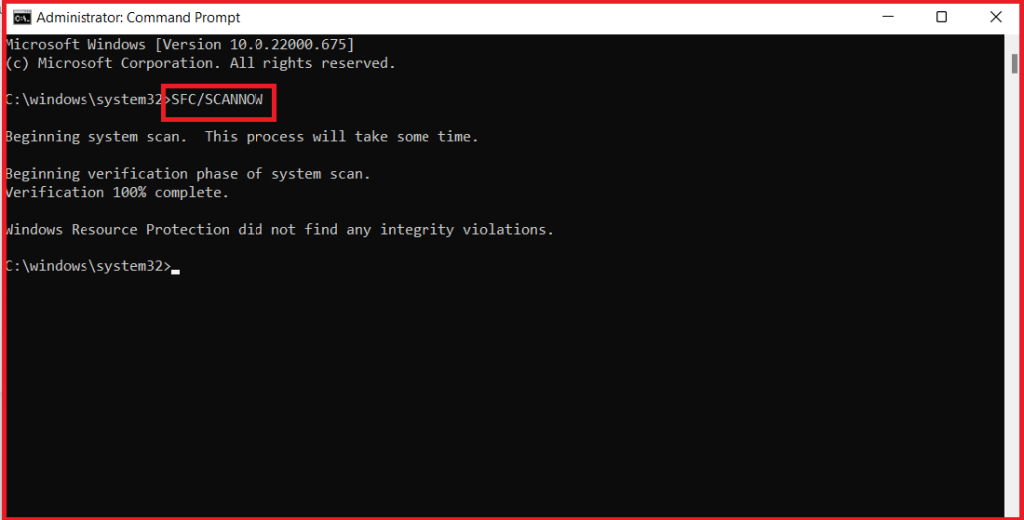
In Windows search bar, type cmd
Right-click on to Command Prompt and choose the Run as an administrator.
When User or customer Account Control shows up, press Yes.
In the new window, use the given following command and press to Enter:
sfc /scannow
- Wait till the scan is done, and then run the following commands (press Enter tab after each):
DISM /Online /Cleanup-Image /CheckHealth
DISM /Online /Cleanup-Image /ScanHealth
DISM /Online /Cleanup-Image /RestoreHealth
Disable your antivirus software:
Sometimes, antivirus software can interfere with the windows update process. Try disabling your antivirus software temporarily and see if the update completes.
How to temper disable Antivirus.
Open Antivirus application (McAfee or Norton or AVG) installed on the computer or system.
Click on to settings button and go to the real time protection.
Pick out the Turn Off real time protection option.
Navigate to Antivirus firewall and select Turn off Antivirus Firewall.
How to disable windows defender
Open to the Windows Security tab
Open the Virus & threat in windows security window.
click for to Manage settings, under Virus & threat protection.
Switch the Real-time protection to turn Off it.
Restart the Windows Update service:
Press the Windows key + R on your keyboard to open the Run dialog box.
Type “services.msc” into the box and press Enter.
Scroll down the list of services until you find “Windows 10/11 Update.”
Right-click on “Windows Update” and select “Stop” from the context menu.
Wait for a few seconds, then right-click on “Windows Update” again and select “Start” from the context menu.
Close the Services window.
Run the Windows Update trouble-shooter:

Windows has a built-in trouble-shooter that can detect and fix common problems related to Windows Update.
To run the trouble-shooter, Go to Settings >
Then go for Update & Security option.
Tap on to Troubleshoot > Additional trouble-shooters.
Windows 10 Update and click on Run the trouble-shooter.
Perform a clean boot:
A clean boot will start Windows with a minimal set of drivers and startup programs. This can help isolate any programs that may be interfering with the windows update process. Instructions for a clean boot can be found here.
Clean boot steps for windows
A clean boot in Windows is a troubleshooting technique that allows you to start your computer with a minimal set of drivers and startup programs to isolate and diagnose problems.
Here are the steps to perform a clean boot in Windows:
Press the Windows key + R on your keyboard to open the Run dialog box.
Type “msconfig” in the text field and press Enter.
In the System Configuration window, click on the Services tab.
Check the box next to “Hide all Microsoft services”.
Click on the “Disable all” button.
Next, click on the Startup tab.
Click on the “Open Task Manager” link.
In the Task Manager window, select each startup item and click on the “Disable” button.
Close the Task Manager window.
Go back to the System Configuration window and click on the OK button.
Restart your computer.
Your computer will now start with a minimal set of drivers and startup programs. If the problem is resolved, you can gradually add back the services and startup programs to identify the one that is causing the issue.
To do this, you can follow the same steps and enable one service or startup program at a time and restart your computer until you find the one that is causing the issue.
Conclusion
If you have problem while doing this method, we recommend you to chat with our online experts. I am sure they will guide you and help resolve this issue. You can also visit website for more details and more information.
Recent Posts
-
Troubleshoot this Office Installation Error Code 1603 October 22, 2024
-
How to Speed Up Windows 11: Troubleshooting Error Message October 22, 2024
-
Fixing the Windows Update Error KB5040442 October 22, 2024
-
Fixing the Windows Error Code 0x80080005 October 22, 2024
-
Troubleshoot the Windows Error Code 0x800b0109 October 22, 2024